Master bulk data submission in Power Apps! This comprehensive guide shows you how to create a WordPress-friendly app for entering multiple records efficiently, using galleries and best practices.
Introduction
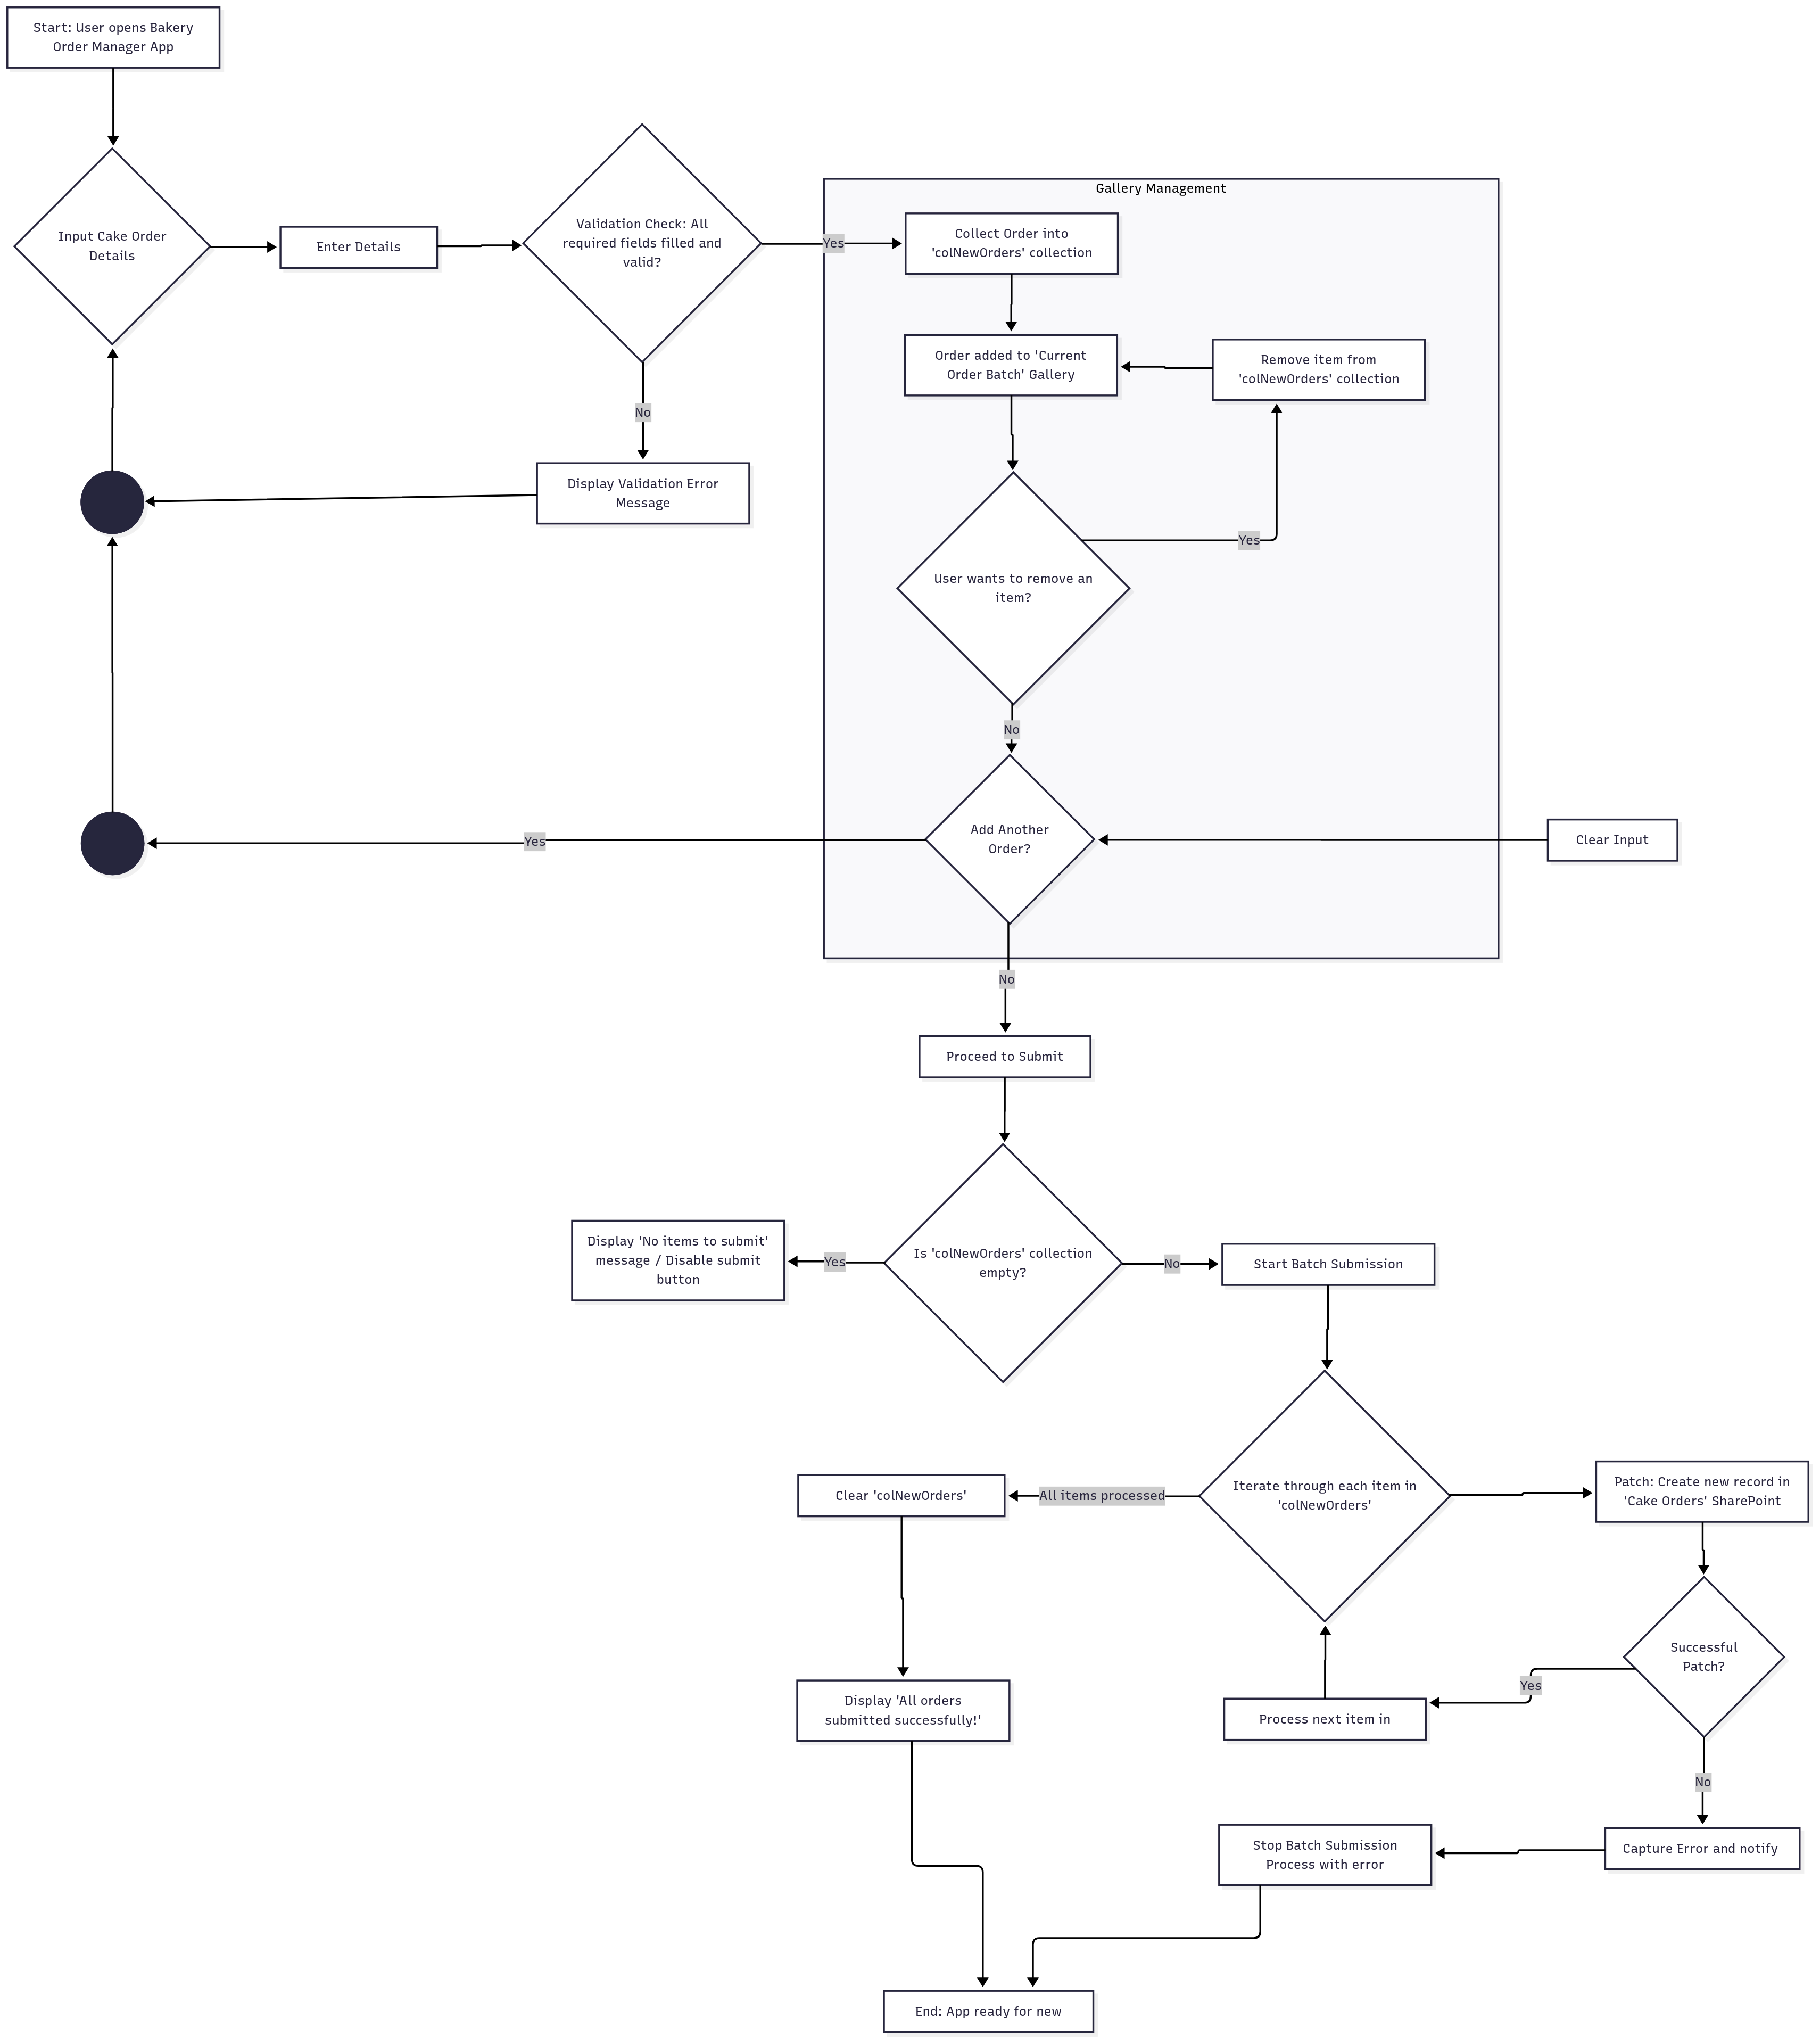
This guide will walk you through creating a Power App that allows users to efficiently submit multiple records in one go. We’ll use a practical bakery order entry example to illustrate the process, making it easy for you to adapt to your own business needs.
Streamlining Order Entry for a Small Bakery
Imagine “Sweet Treats,” a local bakery that relies on efficient order management. Currently, they log each custom cake order into a spreadsheet. When multiple orders come in at once, this manual process becomes a bottleneck, prone to typos and time wastage.
Our goal is to build a Power App that lets bakery staff enter multiple cake orders from a single, user-friendly interface. This app can be easily integrated their site, making the ordering process smoother for staff and potentially for customer-facing portals in the future.
Step-by-Step Guide: Creating Your Power App for Bulk Submission
Step 1: Set Up Your Data Source (e.g., SharePoint)
Before we build the app, we need a reliable place to store our data. For this example, we’ll use a SharePoint list.
- Create a SharePoint List:
- Navigate to your SharePoint site.
- Click “
+ New” > “List”. - Choose “
Blank list” and name it something descriptive likeCake Orders. - Click “
Create“.
- Define Essential Columns:
- Within your
Cake Orderslist, click “+ Add column” and create the following fields:
- Within your
- Title: (Default, good for Customer Name) – Type: Single line of text
- Cake Flavor: Type: Single line of text
- Cake Size: Type: Choice (Options: Small, Medium, Large)
- Decoration Details: Type: Multiple lines of text
- Order Date: Type: Date and time
- Quantity: Type: Number
- Customer Contact: Type: Single line of text
- Status: Type: Choice (Options: Pending, In Progress, Completed)
Step 2: Build Your Power App
Now, let’s create the Power App interface.
- Create a New Canvas App:
- Go to make.powerapps.com.
- Click “
+ Create” > “Canvas app from blank“. - Name your app (e.g.,
Bakery Order Manager) and select a layout (Tablet or Phone). Click “Create”.
- Connect to Your Data:
- In the left-hand navigation, click the “
Data” icon (cylinder). - Click “
+ Add data“. - Search for “
SharePoint” and select it. - Choose your SharePoint connection. If you don’t have one, follow the prompts to create it.
- Select your SharePoint site and then the
Cake Orderslist. Click “Connect“.
- In the left-hand navigation, click the “
Design the User Interface (UI)
- Add a heading label: “Add New Cake Order”.
- Insert
Text inputcontrols for:txtCustomerName(for Title)txtCakeFlavortxtQuantitytxtCustomerContact
- Insert a
Dropdowncontrol for “Cake Size”:ddCakeSize. Set itsItemsproperty to["Small", "Medium", "Large"]. - Insert a
Date pickercontrol:dpOrderDate. - Insert a
Text inputcontrol withModeset toMultilinefortxtDecorationDetails. - Insert a
Dropdowncontrol for “Status”:ddStatus. Set itsItemsproperty to["Pending", "In Progress", "Completed"]. - “Add to Batch” Button:
- Insert a
Buttoncontrol:btnAddtoBatch. - Set its
Textproperty to “Add to Batch”. - Set its
OnSelectproperty to this code:
- Insert a
// Basic Data Validation
If(
    !IsBlank(txtCustomerName.Text) &&
    !IsBlank(txtCakeFlavor.Text) &&
    !IsBlank(txtQuantity.Text) &&
    IsNumeric(txtQuantity.Text) &&
    !IsBlank(ddCakeSize.Selected.Value) &&
    !IsBlank(txtCustomerContact.Text) &&
    !IsBlank(ddStatus.Selected.Value),

    // Collect data into a temporary collection 'colNewOrders'

    Collect(
        colNewOrders,
        {
            CustomerName: txtCustomerName.Text,
            CakeFlavor: txtCakeFlavor.Text,
            CakeSize: ddCakeSize.Selected.Value,
            DecorationDetails: txtDecorationDetails.Text,
            OrderDate: dpOrderDate.SelectedDate,
            Quantity: Value(txtQuantity.Text),
            CustomerContact: txtCustomerContact.Text,
            Status: ddStatus.Selected.Value
        }
    );

    // Clear input fields after adding to batch
    Reset(txtCustomerName);
    Reset(txtCakeFlavor);
    Reset(txtQuantity);
    Reset(txtCustomerContact);
    Reset(ddCakeSize);
    Reset(dpOrderDate);
    Reset(txtDecorationDetails);
    Reset(ddStatus);

    // User feedback
    Notify(
        "Item added to batch.",
        NotificationType.Success
    ),
    // Error message for validation failure
    Notify(
        "Please fill in all required fields correctly.",
        NotificationType.Warning
    )
)
Gallery to Display the Batch
- Add a heading label: “Current Order Batch”.
- Insert a
Gallerycontrol (e.g., Blank flexible height). - Set its
Itemsproperty tocolNewOrders. - Inside the Gallery Template: Add labels to display item details:
- Customer Name:
ThisItem.CustomerName - Cake Flavor:
ThisItem.CakeFlavor - Quantity:
ThisItem.Quantity
- Customer Name:
- (Optional) Remove Item Button: Inside the gallery template, add an “X” icon. Set its
OnSelectproperty to:
Remove(colNewOrders, ThisItem); Notify(
"Item removed from batch.",
NotificationType.Information);
Step 3: Implement the Submit Button
This is where we send the collected data to our SharePoint list.
Add the Submit Button
- Insert a
Buttoncontrol:btnSubmitAllOrders. - Set its
Textproperty to “Submit All Orders”. - Control Button Visibility/Enablement: Set its
DisplayModeproperty to:
If( IsEmpty(colNewOrders), DisplayMode.Disabled, DisplayMode.Edit)This prevents users from clicking submit if no items are in the batch.
Write the Submit Logic
- Select the
btnSubmitAllOrdersbutton. - Set its
OnSelectproperty to this code:
// Use IfError for robust error handling during the submission process
IfError(
    // ForAll iterates through each record in the 'colNewOrders' collection
    ForAll(colNewOrders,
        Patch(
            'Cake Orders', // Your target SharePoint List
            Defaults('Cake Orders'), // Creates a new record
            {
                Title: CustomerName, // Maps collection field to SharePoint column
                CakeFlavor: CakeFlavor,
                CakeSize: { Value: CakeSize }, // Note: Choice columns require {Value: ...}
                DecorationDetails: DecorationDetails,
                OrderDate: OrderDate,
                Quantity: Quantity,
                CustomerContact: CustomerContact,
                Status: { Value: Status } // Note: Choice columns require {Value: ...}
            }
        )
    );

    // Actions to perform on successful submission:
    Clear(colNewOrders); // Empties the temporary collection
    Notify("All orders submitted successfully!", NotificationType.Success), // Success feedback

    // Action to perform if an error occurs during submission:
    Notify("An error occurred during submission. Please check your input and try again.", NotificationType.Error) // Error feedback
);
Step 4: Test Your Power App
Thorough testing is crucial for any application.
Preview the App: Click the “Play” button (triangle icon) in the top-right corner of the Power Apps Studio.
Add Multiple Records
- Enter details for the first cake order in the input fields.
- Click “Add to Batch”. The item should appear in the “Current Order Batch” gallery, and the input fields should reset.
- Repeat this for 3-5 more orders.
- Test the “remove” functionality if you added it.
Submit the Batch
- With several items in the “Current Order Batch” gallery, click the “Submit All Orders” button.
Verify Data
- Navigate to your SharePoint
Cake Orderslist. All the submitted records should be present and correctly populated. - Check that the “Current Order Batch” gallery in your app is now empty.


Leave a comment